Expanding your cleaning business by offering services online can increase your customer base and make your operations more efficient. Plus, by using WordPress, you can easily showcase your services, manage bookings, and accept payments—all in one place.
Setting up an online site for your services not only simplifies the booking process but can also help you reach more customers who are searching for local cleaning services online.
This helps you stay ahead of the competition and grow your business in a more streamlined way.
Over the past 16+ years, we have used WordPress for a wide range of business purposes, from selling plugins to creating blogs. Throughout this time, we’ve seen just how flexible and scalable the platform is. It’s super user-friendly, requires minimal coding knowledge, and allows you to build any type of website using the right plugins.
Overall, we have had a fantastic experience with WordPress, and that’s why we continue to recommend it for all kinds of online projects. And in this article, we will show you how to easily sell cleaning services online with WordPress, step by step.

Why Sell Cleaning Services Online With WordPress?
WordPress allows you to create a professional-looking website that showcases your cleaning services. You can customize its design, layout, and content to reflect your brand and attract potential customers.
Sure, you can and should be on business directories like Yelp, Google My Business, HomeAdvisor, and Angie’s List, but those third-party platforms don’t give you complete control.
Beyond that, you can’t effectively capture leads and build an email list either. Your website is the only place where you control your marketing.
You can create a blog to build trust and nurture leads. Plus, WordPress lets you get traffic from multiple sources, such as through SEO, social media, and paid advertising.
Additionally, having a website allows you to integrate a flexible booking system and accept payments instantly, making it a smart way to drive business growth.
How to Create a Cleaning Services Website With WordPress
Before you start selling your cleaning services, you will need to make a website using a website builder. We recommend WordPress.org because it is the best option and is used by over 43% of the sites on the Internet.
It is free, scalable, beginner-friendly, and can integrate with plugins to help you sell your services.
Note: Keep in mind that there are two types of WordPress. WordPress.com is a blog hosting platform, while WordPress.org is an open-source, self-hosted software. To learn more, see our comparison between WordPress.com and WordPress.org.
Now that you have selected your website builder, you need to purchase a hosting plan and domain name. Hosting is where all your website data will be stored, while a domain name is your site’s name on the Internet.
This can be a bit expensive. That is why we recommend Bluehost. It is a WordPress-recommended hosting company that is offering a generous discount to WPBeginner readers along with a free domain name and SSL certificate.

To avail of the offer, just click the button below.
Once you have done that, you can see our beginner’s guide on how to make a small business website for more instructions. Then, you need to create a services section in WordPress.
Expert Tip: If the process above seems complex to you, then you can opt for WPBeginner’s Website Design Services. With over a decade of WordPress expertise, our team can design and set up your site exactly how you envision it, all within a short period of time.
This option lets you skip the technical details and focus on your business while we bring your website to life. To learn more, see our WPBeginner Pro Services page.
Having said that, let’s see how to sell your cleaning services online with WordPress. You can use the links below to jump to the method of your choice:
Method 1: Sell Cleaning Services Online Using WPForms (Recommended)
WPForms is the best contact form plugin on the market that also allows you to easily create cleaning appointment booking forms, reservation forms, and calculator forms to attract new leads.
Plus, it has a great AI-powered form builder that allows users to simply enter the details of the type of form they need. WPForms will then automatically create a cleaning services form that is tailored to their specific requirements.
We even use this tool across our partner brands to add all kinds of forms and have had a consistently positive experience with it. For more information, see our complete WPForms review.
If you create a booking form with WPForms, you can automatically send those form entries to Google Calendar without having to do it manually. This will save you a ton of time and make managing cleaning appointments very easy.
First, you need to install and activate the WPForms plugin. For more details, check out our tutorial on how to install a WordPress plugin.
Note: While WPForms has a free version, you will need the paid plans to access the Zapier add-ons, which allow you to connect Google Calendar to WPForms.
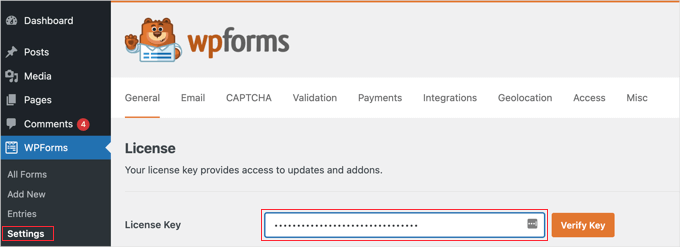
Upon activation, visit the Settings » General page from the WordPress dashboard to enter your license key.
You can get this information from your account on the WPForms website.
Now, before you create your cleaning appointment booking form, you must connect WPForms to a payment gateway. Stripe is our recommended choice since it allows you to easily accept credit card payments.
In addition, they offer a ton of other options, such as the ability to set up one-click checkout so existing Stripe users don’t need to manually enter their credit card details.
To do this, head over to the WPForms » Settings page. Then, under the Payments tab, click on ‘Connect with Stripe.’
This will take you to the Stripe connection wizard. Simply enter your existing Stripe email or create an account if you don’t already have one.
Follow the steps in the process to connect WPForms to Stripe.
From there, you should be taken back to the Payments tab. You should also see that Stripe is connected to WPForms.
Now, you are ready to accept payments in WordPress.

To start the process, go to the WPForms » Add New page in your WordPress admin dashboard and give your form a name so that you can refer to it later.
After that, you can choose the ‘Generate With AI’ option in the WPForms library to create a cleaning services form using artificial intelligence.

This will open the form builder on your screen. In the sidebar on the left, you can type in details for your cleaning services form.
Here, you can specify the type of form that fits your website’s needs.
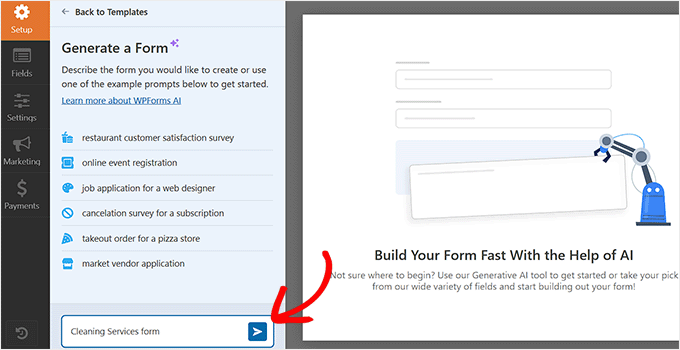
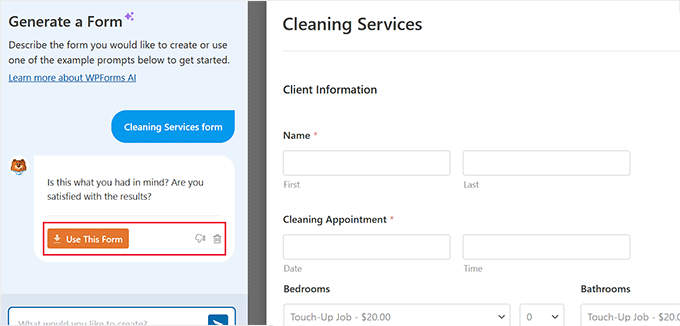
The WPForms AI builder will now generate a form according to your description. Once the process is complete, you will see a preview on the right.
You can then type further prompts to customize the form with AI. However, if you are satisfied with the results, just click the ‘Use This Form’ button in the sidebar.
The newly created form will now be launched in the form builder, where you can edit it according to your liking by following this tutorial.
However, if you don’t want to use AI, don’t worry—the WPForms library also has over 2000+ templates to choose from.
For this tutorial, we will use the ‘Home Cleaning Services Order Form’ template, but you can also use the appointment booking form templates.
Simply hover over the option and click the ‘Use Template’ button.

In this form, you will notice a wide range of fields already added to the template, such as:
- Client Information: Name, email, phone number, and home address.
- Cleaning Services: The types of cleaning services include the bedroom, bathroom, living spaces, kitchen, garage, and outdoor areas.
- Special Instructions: Customers enter any special instructions they have for the maid.
- Date and Time: When users would like to book the appointment.
- Payment: Cost of the services.
- Credit Card Details: Users enter their credit card information to reserve their spot.
That said, you are not limited to these fields.
WPForms has a drag-and-drop builder where you can simply drag the fields from the ‘Add Field tab to the right-side editor.
For example, you can add a multiple-choice option to the form, which could come in handy if you want to ask users about the type of services they’d like, such as deep cleaning, carpet cleaning, housekeeping services, laundry, and so on.
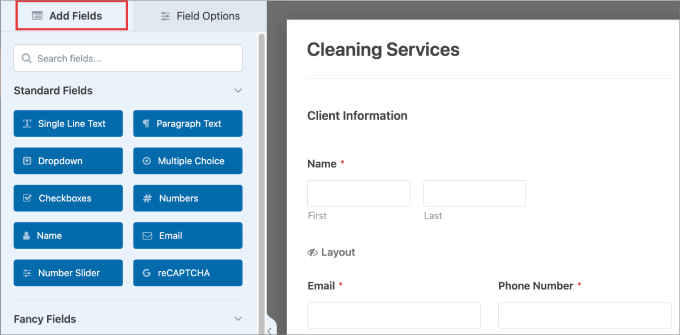
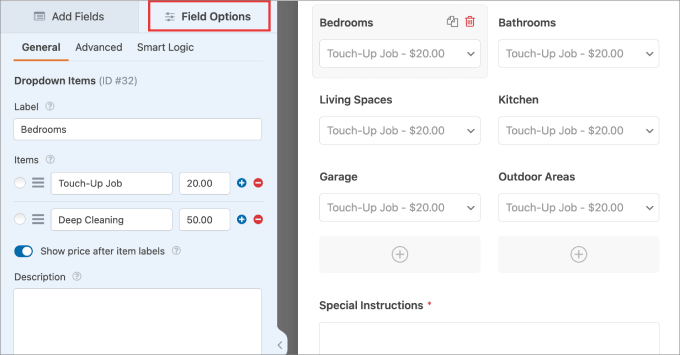
Beyond that, you can also edit the existing fields. Just click on the element you’d like to edit.
This will open the field settings in the left column, where you can edit the text, multiple-choice options, price, description, and more.
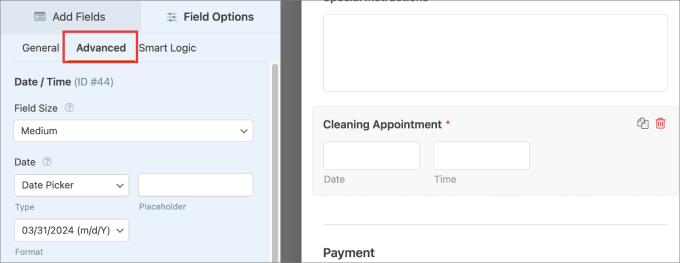
Another field you may want to edit is the date and time field.
For this, open the field’s settings and then switch to the ‘Advanced’ tab.
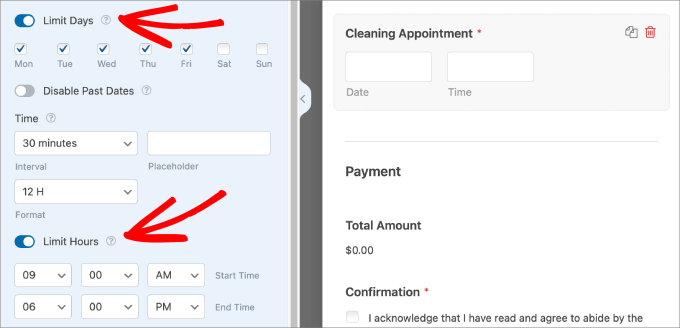
Then, scroll down the side panel to see options such as the ability to limit days or hours.
From here, you can limit your working days and hours so that potential customers don’t book your services when you are unavailable.
Once you are finished, visit the Settings » Confirmations page in the drag-and-drop builder. Here, you can customize the message that customers receive once they make a payment and complete your home cleaning order form.
The confirmation message should let them know you received their request. You may also want to inform them about what to expect, especially for first-time customers.
WPForms offers 3 types of confirmation types:
- Message: This is a message that appears immediately when customers complete the form.
- Show Page: This takes visitors to a specific web page on your site.
- Go to URL (Redirect): This option takes users to a different website.

For detailed instructions, see our tutorial on how to create a thank you page in WordPress.
Next, you need to click the ‘Save’ button at the top to store your settings.
From here, go ahead and hit the ‘Embed’ button to add the form to your website.

You should see a pop-up message asking if you want to select an existing page or create a new page.
Choose the option that fits your needs.
In our example, we are selecting an existing page.
The form you’ve created should appear on your page.
Make sure everything looks good, and then hit the ‘Publish’ or ‘Update’ button at the top.

Now, your form should be published on your website.
You can visit the page to see the form in action.

Create a Form Entry to Use as a Test
Next, you’ll need to submit a test entry on your website so that it will appear on Google Calendar later.
Once the test entry is submitted, visit the WPForms » Entries page from the admin sidebar. Here, you should see information such as the Name, Home Address, and Date of Entry.
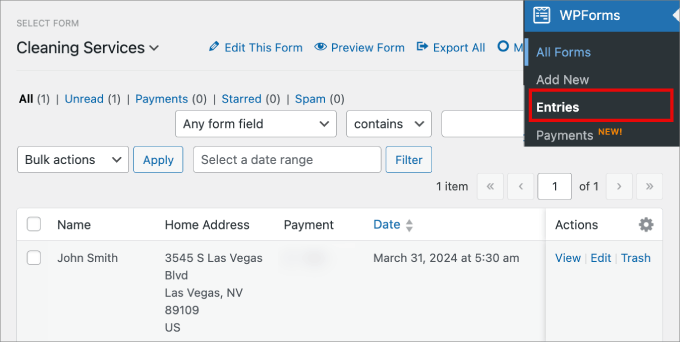
In addition, you can filter the form entries by any of the fields that you’ve added to the cleaning order form.
You can filter by field by clicking ‘Search.’ This could be useful if you want to search for specific criteria.

Integrate WPForms with Google Calendar
Now, all that is left to do is integrate your form entries into Google Calendar so that your team knows which time slots are already booked and customers don’t double-book an unavailable time.
For this, head over to the Zapier website and create an account. This will open a dashboard on your screen.
On the left side panel, hit the ‘Create’ button and then select ‘Zaps.’
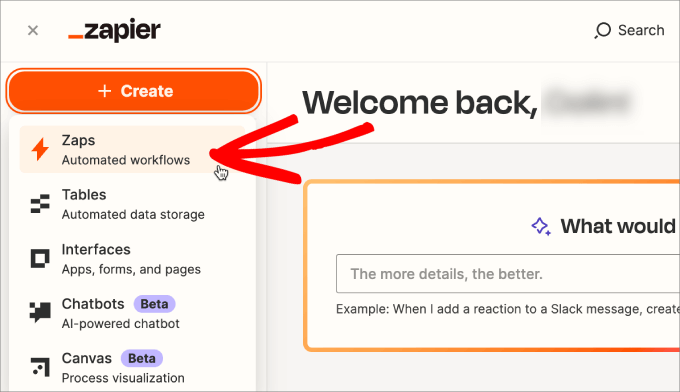
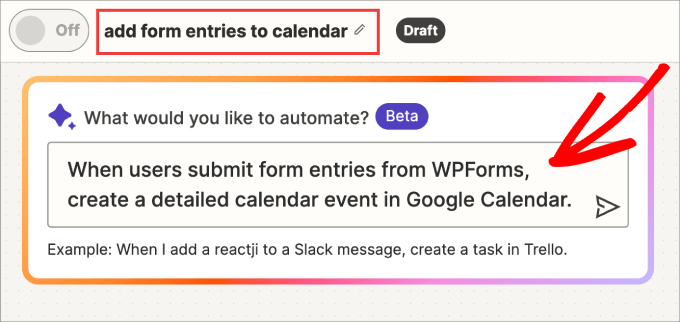
Start by giving your Zap a name at the top so you can refer back to it later should you need to make changes.
You could add WPForms and Google Calendar individually. However, Zapier has a new AI feature where you can tell it what you want to automate.
In the message bar, just type in something along the lines of “When users submit form entries from WPForms, create a calendar event in Google Calendar.”
Then hit enter.
In the side panel, you should see that the AI chat system suggests the zaps that best describe what you’re looking for.
Click the ‘Replace all steps to Zap’ option to add a new form entry in WPForms as the trigger and the ‘Create a detailed event in Google Calendar’ as the desired action.
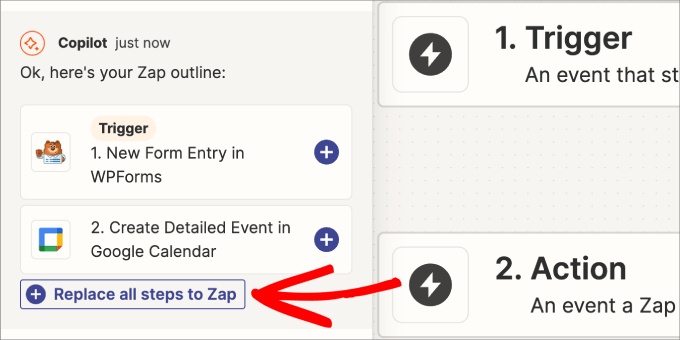
Once the Zap outline is created, you’ll need to connect your cleaning services form to Zapier.
Simply click ‘Open Step.’

In the ‘App & event’ and ‘Account,’ make sure that your WPForms account is connected.
In the ‘Trigger’ section, you’ll select your cleaning services from from the ‘Form’ dropdown menu or use the search bar.
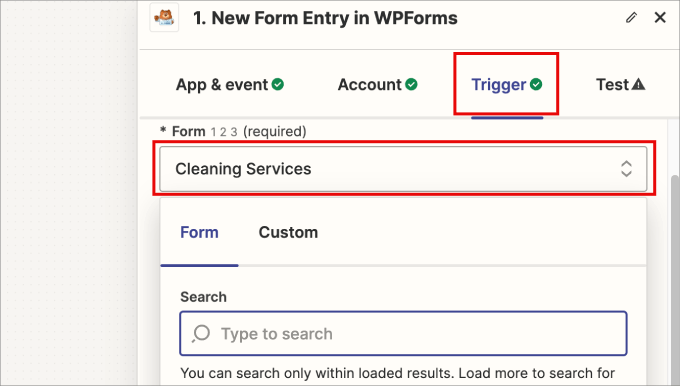
You should see your entire list of forms from WPForms and simply select the cleaning services form you’ve just created.
Then scroll down and hit ‘Continue.’

Next, you’ll be asked to test the trigger to see if Zapier can connect to your WPForms account.
Go ahead and click ‘Test trigger.’
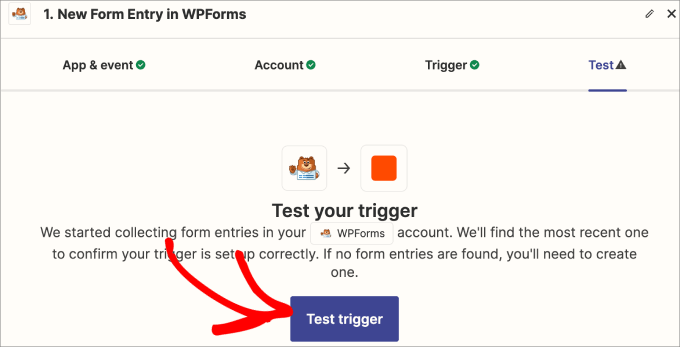
You should see a few of the most recent form entries appear.
Make sure to review the information to see that it correctly pulled all of the fields from your form.
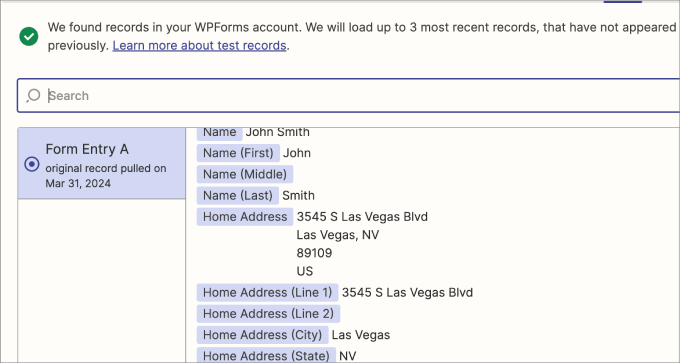
Then, scroll down to the bottom of the panel.
Click on the ‘Continue with selected record’ button.
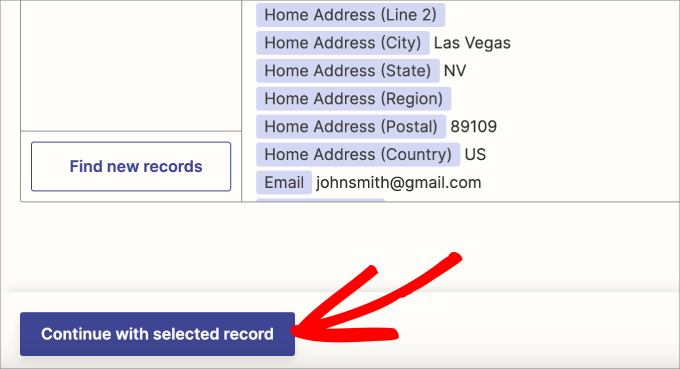
Now that your WPForm entries are recorded, you’ll be asked to connect your Google account.
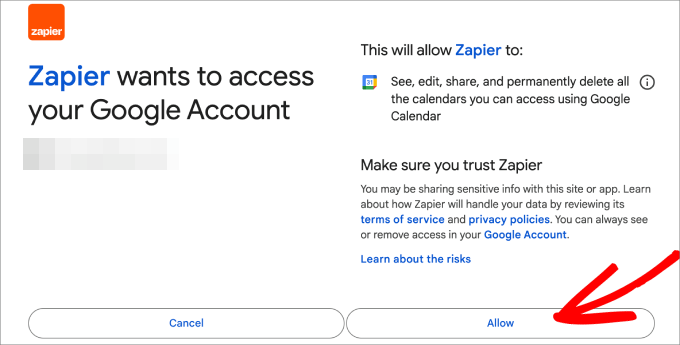
Under the Account tab, click on ‘Sign In’ to connect your Google Calendar to Zapier.

A new window will open where you’ll sign into your Gmail account.
Then, click ‘Allow’ to share all the data from your Google Calendar with Zapier.
In the ‘Action’ tab, you’ll need to tell Zapier what fields to add to each calendar event.
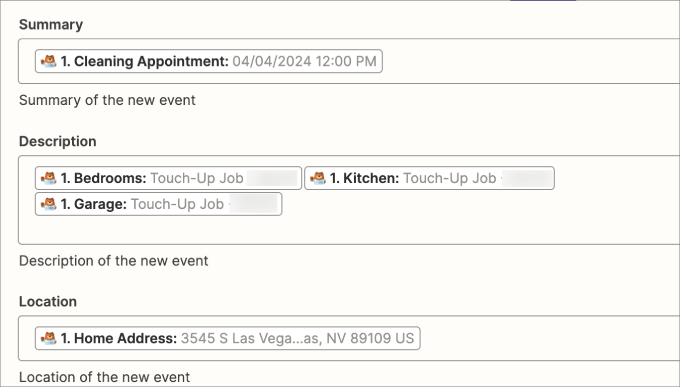
Every calendar event will automatically pull data from each form submission, so you’ll need to use the tags to select the information you want to include.
To add the tag, click on each box, which will automatically show a dropdown list of the available field tags in your form.

For example, you can add the cleaning appointment tag in the summary section. In the description, you might want to add the type of cleaning services.
Also, in the location, you can add where the business address of the residential or commercial property is.
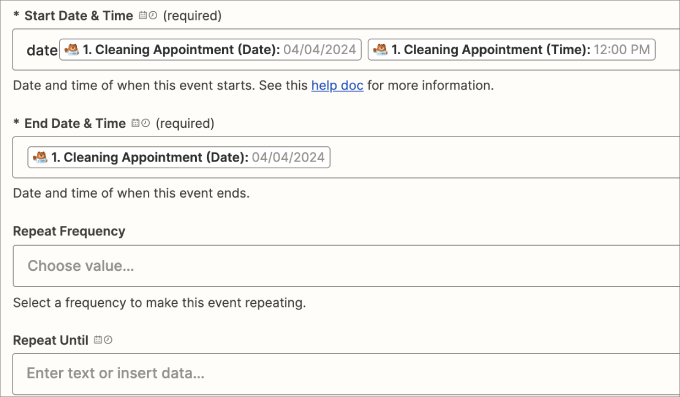
If you scroll down, you can also add the tag that tells you the date and time of the appointment.
If you have a field for recurring appointments then, you can add them in the repeat frequency option.
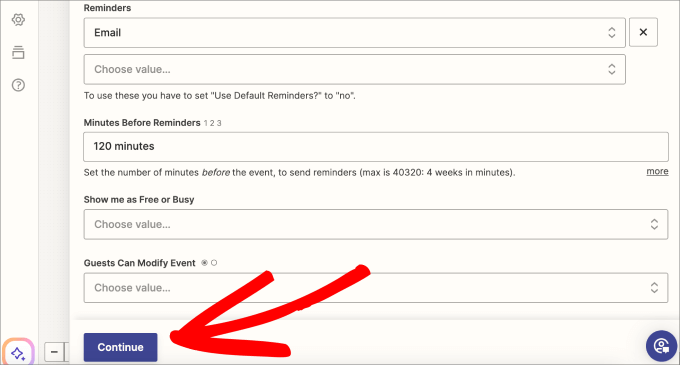
Finally, it’s a good idea to set reminders to ensure you don’t miss a cleaning appointment.
You can set where to send the reminders, such as via email or text. In the minutes before reminder field, write the minutes before the appointment you’d like the reminder sent to you.
When you’re finished, you can hit the ‘Continue’ button to move on.
On the next screen, you’ll see a summary of all the fields that will be pulled from your Cleaning Appointment Orders form and sent to Google Calendar.
Check that all the details are correct, and then hit the ‘Test step’ button.

You should see a green checkmark next to Test to indicate it was successful. If there is an error, it’ll tell you where and how to troubleshoot the issue.
That said, scroll down the summary of the connection and click ‘Publish.’
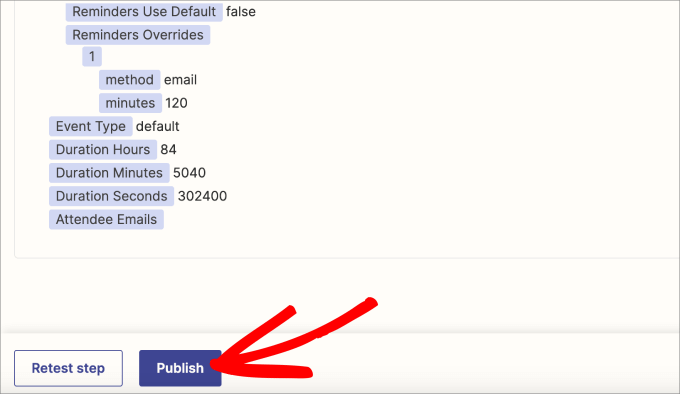
Lastly, you can check that the events are on your Google Calendar.
All of the form fields you’ve selected should be added to the details of the calendar event.

There you have it. You now know how to sell cleaning services online using WPForms.
Method 2: Sell Cleaning Services Online Using WP Simple Pay
If the method above seems too complex or you want to offer more payment options, then you can also use WP Simple Pay to sell cleaning services online. This is the best Stripe payments plugin for WordPress.
WPForms offers more form templates and field options to collect all the information you need from customers. That said, WP Simple Pay is great if you want to provide more payment options.
With this plugin, you get 13 payment methods, including buy now, save later options, one-click checkout, and recurring payments.

First, you need to install and activate the WP Simple Pay plugin. For details, see our tutorial on how to install a WordPress plugin.
Note: WP Simple Pay has a free plan that you can use for this tutorial. However, to unlock all the payment options, you will need the pro plan.
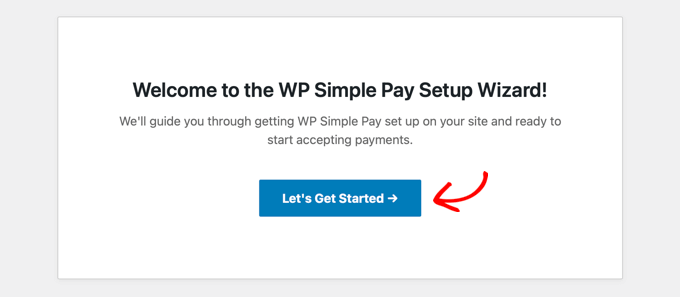
Upon activation, a setup wizard will appear on your screen.
Here, click the ‘Let’s Get Started’ button.
This will take you to a new page, where you must enter your license key. This option applies only to users with a pro plan. You can find this information in your account on the WP Simple Pay website.
Once that is done, just click the ‘Activate and Continue’ button.

You will then be asked to connect your plugin with Stripe. It is a popular payment gateway that easily accepts online payments.
To do this, click the ‘Connect with Stripe’ button.

You will now be taken to a new screen, where you must log in to your Stripe account to connect it with WP Simple Pay. If you don’t have an account yet, you can create one by visiting the Stripe website.
For step by step instructions, see our tutorial on how to accept Stripe payments in WordPress.
After that, the setup wizard will ask you to configure email settings. You can then enable the option to receive email notifications for payment receipts, upcoming invoices, and payment notifications and enter the email address to send them to.
Next, click the ‘Save and Continue’ button.

Now go to the WP Simple Pay » Add New page from the WordPress dashboard.
Here, you will see plenty of ready-made payment form templates on the screen. For the sake of this tutorial, we will choose the ‘Cleaning Service Payment Form’ template.

In the ‘General’ tab, provide the title and description of the payment form.
This way, customers know what the form is about.

In the ‘Payment’ tab, you’re able to edit all of the available services.
You can edit each pricing option by hitting the expand button. If you hit the ‘Add Price’ option, you can add another cleaning service.

Within each service, you can customize its name, set the price, and choose whether to charge a one-time fee or subscription.
If you choose a subscription, you can set the recurring billing period to either days, weeks, months, or years.

If you scroll down, you can choose between 13 different payment methods, such as credit card payments, ACH direct debit, Cash app, Alipay, Klarna, and Afterpay.
Just check the box next to each desired payment method.

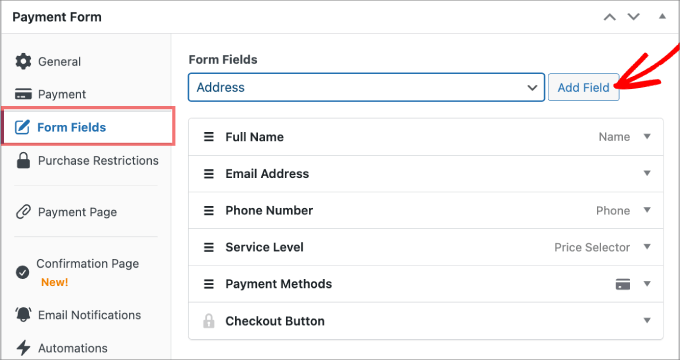
Next, in the Form Fields tab, you can customize any of the existing fields or add new fields.
For instance, if you want to require users to include their home address, you can select it from the dropdown menu and then click ‘Add Field.’
After that, switch to the Confirmation Page tab to add a message that reassures users that their form submission was received.
In addition, you can let them know what to expect moving forward.

Once you are done, go ahead and click ‘Publish’ on the right side of the screen.
You’re now ready to embed the cleaning service payment form into a page on your website.
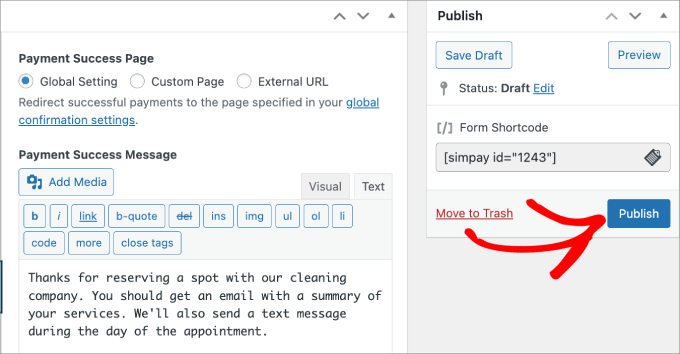
Next, go to the page to which you’d like to add the payment form.
Click the ‘+’ icon and then add the WP Simple Pay block.
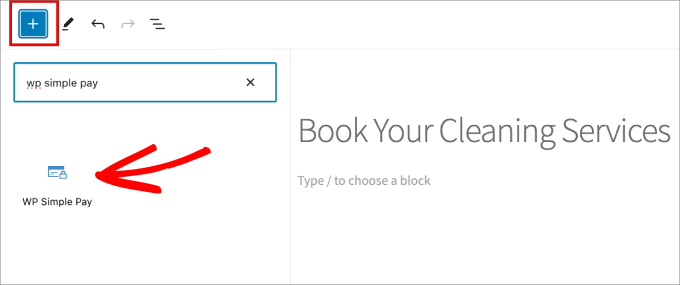
Then select the cleaning service payment form you’ve just created.
From there, go ahead and hit ‘Publish’ or ‘Update’ to make the form live.

You’ve successfully created your cleaning services payment form and can now start accepting payments in advance.
Here is a preview of a cleaning services form that we created.

Bonus Tools to Help Grow Your Cleaning Services Website
Here is a list of some tools that you can use on your cleaning services website to boost conversions, get more visitors, and improve SEO:
We hope this article helped you learn how to sell cleaning services online with WordPress. You may also want to see our step-by-step guide on how to sell ads on your WordPress blog and our list of some amazing ways to protect your content in WordPress.
If you liked this article, then please subscribe to our YouTube Channel for WordPress video tutorials. You can also find us on Twitter and Facebook.


