Setting up a B2B eCommerce store in WordPress is a great way to expand your business and efficiently serve other companies.
With WordPress, you can use customizable plugins like WooCommerce and Wholesale Suite to create a tailored experience for your customers. From secure payment gateways to managing bulk orders, WordPress offers the functionality and flexibility you need for B2B transactions.
Over the past decade, we have built numerous WordPress sites, including eCommerce stores and blogs. This hands-on experience has given us a deep understanding of the platform’s scalability for creating online stores.
We’ve also extensively tested popular tools like WooCommerce and Wholesale Suite and have written plenty of articles about using them. To put it simply, we’re super familiar with these WordPress tools, and we’re confident we can guide you through the process of using them to build a B2B store.
In this article, we’ll walk you through every step. Along the way, we’ll help you get the most out of your B2B store in WordPress.
What is a B2B WordPress eCommerce Store?
A B2B WordPress eCommerce store is an online shop that specifically caters to businesses rather than individual consumers.
For instance, a luxury wholesale retailer might sell bulk orders of clothing to smaller boutiques. Or, a local flower shop might start selling their bouquets online in bulk for corporate events.
B2B eCommerce sites often have more complex product catalogs and advanced features tailored to business customers. Plus, they need to be able to process much larger transactions.
If you already sell wholesale products to individuals, then opening a B2B eCommerce store can be a great way to increase revenue.
You can expand your market and give businesses an easy way to browse, choose, and buy your products online. It streamlines sales processes without the need for physical storefronts or additional sales staff.
What’s more, it’s a cost-effective solution that lets you reach customers globally. As your business grows, you can scale operations to handle higher demand without paying major overhead costs.
Having said that, let’s look at all the steps to set up a B2B eCommerce store in WordPress. Here’s a quick overview of what we’ll be going over in this tutorial:
Now, let’s get to it!
Step 1: Choose a Website Builder
The first step is choosing a website builder.
We recommend WordPress for building your B2B eCommerce store because it is the best website builder. WordPress is free, customizable, and flexible. It is also used by over 43% of websites on the internet.
However, before making your choice, you should know that there are two types of WordPress available: WordPress.com and WordPress.org.
To put it simply, WordPress.com is a managed hosting provider that allows you to use the core WordPress software but with limitations. You can pick between free or paid plans to use it.
Meanwhile, WordPress.org is completely free and gives you full control of the core software, so you can modify and extend it exactly as you like. But you’ll need to choose a web host to use alongside it to get the necessary resources to put your site online.
To learn more, see our comparison of WordPress.com and WordPress.org.
That said, if you want to build a B2B site, we strongly recommend WordPress.org because it is free and can easily integrate with plugins like WooCommerce and Wholesale Suite, which make it easy to set up your online store.
For in-depth details, see our complete WordPress.org review.
Step 2: Purchase a Hosting Plan and Domain
To start building your business on WordPress, you will first need to purchase a hosting plan and domain name.
A web hosting provider gives your site the server space and resources it needs to be online. Meanwhile, a domain is your website’s name on the internet, like www.wholesaleproducts.com.
Even though WordPress itself is free, this is where your costs will start adding up. A domain name can cost you about $14.99/year, and hosting costs start from around $7.99/month. This can be a bit expensive if you have a small budget or are just starting out.
Thankfully, Bluehost is offering a generous discount to WPBeginner readers, along with a free domain name and SSL certificate.
Bluehost is an official WordPress-recommended hosting partner and one of the most reliable platforms for purchasing a hosting plan.
To get the discount, just click the button below.
This will direct you to the Bluehost website, where you will need to click the ‘Get Started Now’ button.

You will now be taken to the pricing page to pick a hosting plan.
We recommend choosing the ‘Online Store’ plan since you will be setting up a B2B store.

Once you make your choice, you will be taken to the next step, which is to select a domain name for your website. In most cases, we recommend using your company name.
If you are just starting out, then you can use our WPBeginner Free Business Name Generator to come up with your company’s name.
However, keep in mind that sometimes the domain name will already be taken by some other business.
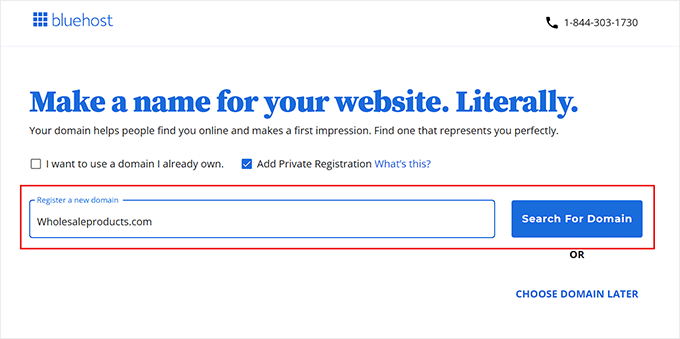
In that case, you can try adding extra keywords or your location to make your domain name stand out. For instance, instead of www.wholesaleproducts.com, you could use www.wholesaleproductsohio.com (though this may be a bit too long).
If that doesn’t work out, you can always pick a domain name that reflects something related to your business. Just make sure it’s easy to pronounce and spell.
For more ideas, see our beginner’s guide on how to choose the best domain name.
After choosing a name, just click on the ‘Next’ button to continue.
You will now be asked to provide your account information, including your business email address, name, country, phone number, and more.
After that, add your payment details to complete the purchase.

You will then get a confirmation email with information on how to log in to your Bluehost control panel. This will be your account dashboard where you will manage your B2B WordPress eCommerce store.
Step 3: Create a WordPress Website
If you just signed up for web hosting using our Bluehost link above, then they will automatically install WordPress on your domain name.
However, to create the WordPress site, you need to click the ‘Websites’ tab in the Bluehost dashboard. Once you are there, select the ‘Add Site’ button.

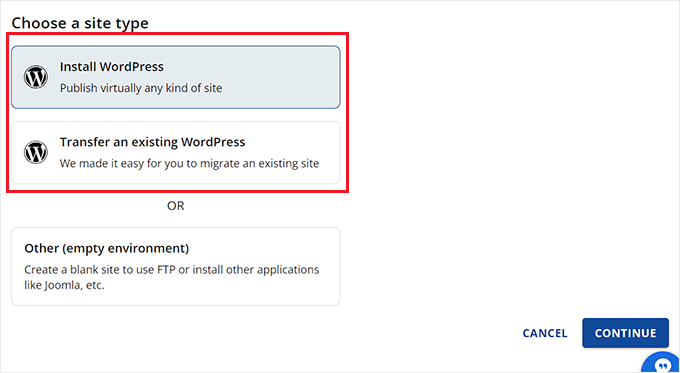
This will take you to a new page where you have to choose a site type.
To create a completely new website, you need to select the ‘Install WordPress’ option. However, to migrate an existing site to a different domain name, you can choose the ‘Transfer an existing WordPress’ option.
After that, click the ‘Continue’ button to move on.
Then, add a site name that matches your B2B eCommerce store.
After that, click the ‘Continue’ button.

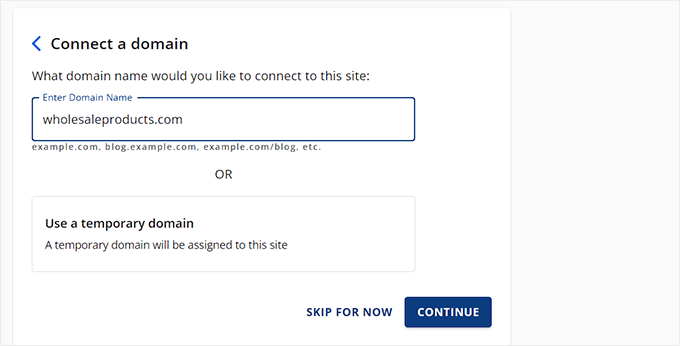
Bluehost will now ask you to connect to a domain name for your website.
However, if you haven’t bought a domain yet, then simply choose the ‘Use a temporary domain’ option and click ‘Continue.’
Bluehost will now start setting up your WordPress site, which can take a few minutes.
Once that is done, you will be redirected to the ‘Websites’ tab, where you can find your new site. Here, just click the ‘Edit Site’ button to log in to your WordPress admin area.
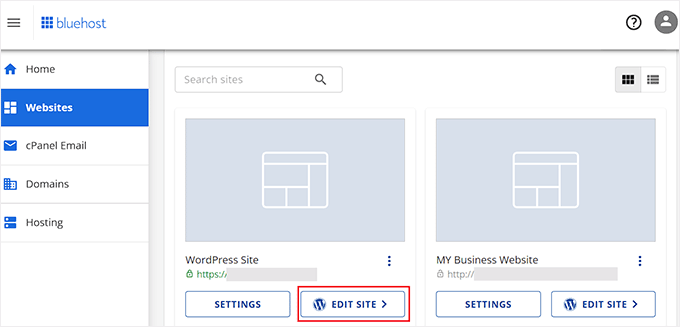
You can also log in to the dashboard by going to yoursite.com/wp-admin/ in your web browser.
Step 4: Choose and Customize Your WordPress Theme
A WordPress theme is a professionally designed template that determines what the front end of your website looks like.
The great thing about WordPress themes is that they can provide you with a solid foundation for your website’s design. That way, you don’t have to start from scratch. Plus, you can customize any theme.
Once you install WordPress and visit your site, you will notice it has a default theme installed:
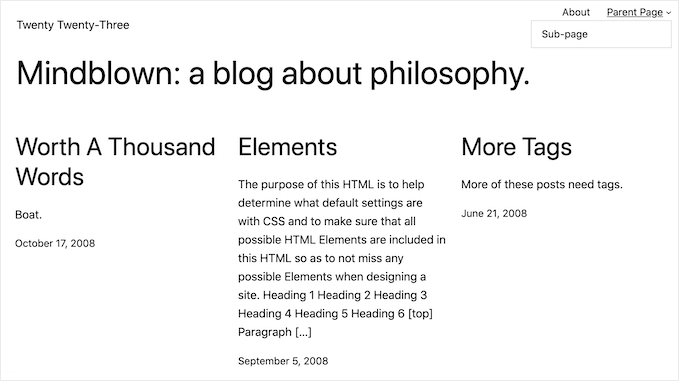
This is simply a generic option that WordPress changes every year.
We recommend replacing it with a theme that matches your niche and branding to create a better user experience and support a strong online presence.
To get started, you may want to search for a commercial theme in the WordPress theme directory.

You can try a keyword related to your niche. To refine your search, you can use the filters for ‘Layout,’ ‘Features,’ and Subjects.’
You may also want to check out our list of the best WooCommerce themes, which includes tons of excellent options for eCommerce sites.
All that said, if you are looking to create a fully customizable theme for your B2B store, then we recommend SeedProd.

It is the best WordPress theme builder on the market, letting you create a theme without using any code. It even comes with multiple WooCommerce store templates and additional blocks to set up your business in a few minutes.
For more information, see our full SeedProd review.
Upon plugin activation, simply visit the SeedProd » Theme Builder page from the WordPress dashboard and click on the ‘Theme Template Kits’ button.

This will take you to a new screen where you can browse through various premade theme templates. You can even use the WooCommerce filter to find themes specifically designed for online stores.
Whether you’re setting up a store for pottery, flowers, or electronics, you will find templates suited for your B2B needs. This makes it easier to launch your eCommerce site efficiently.

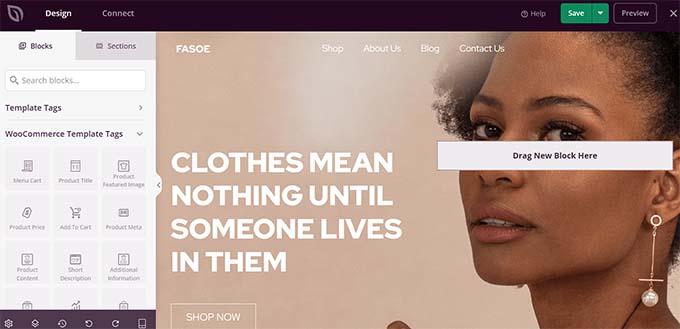
Once you find a theme, simply click on it to launch it. SeedProd will now create all the page templates you need for your store and open the home page in the drag-and-drop builder.
You can then drag and drop any block you want from the column on the left into the page preview. To learn more, see our tutorial on how to create a custom theme in WordPress.
Once you are done, just click the ‘Save’ button at the top.
If you decide to use a different theme for your eCommerce store, then see our guide on how to install a WordPress theme.
After installation, you can visit the Appearance » Customize page from the WordPress dashboard after activation. This will open the theme customizer.
Here, you can change the theme settings according to your liking.
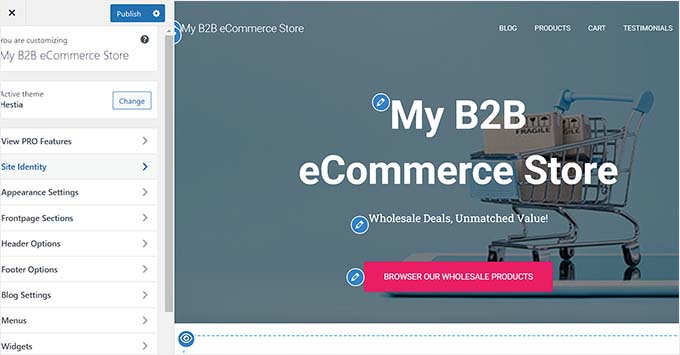
Keep in mind that this only works for classic themes.
On the other hand, if you are using a block theme, then you will need to go to Appearance » Editor in the left-hand menu of your WordPress dashboard.
This will open the full site editor, where you can use blocks to customize your entire theme.
When you are done, just click the ‘Save’ button to store your settings.

For more information, check out our complete beginner’s guide on how to customize your WordPress theme.
Step 5: Create a Home Page And Navigation Menu
Once you’ve customized your theme, it’s time to set up the home page for your B2B store.
This page will be visitors’ introduction to your website, so you’ll want to make sure it makes an impression. For detailed instructions, see our tutorial on how to create a custom home page in WordPress.

After you have finished designing, you need to set the page as your home page. To do this, visit the Settings » Reading page in your WordPress dashboard.
In the ‘Your homepage displays’ section, select ‘A static page.’ Then, open the ‘Homepage’ dropdown and choose the page you want to use.
Finally, don’t forget to click the ‘Save Changes’ button at the bottom to store your settings.

Now, you need to create pages on your website where you will be showcasing your products, displaying customer reviews, collecting payment information, and more. For details, see our tutorial on how to create a page in WordPress.
Once you do that, you’ll also need to add a navigation menu with links to these pages. This will make it easier for visitors to browse your website.
To start building your navigation menu, go to Appearance » Menus in your WordPress dashboard and expand the ‘Pages’ tab on the left.
Now, check all the pages that you want to add to your navigation menu and click the ‘Add to Menu’ button.

After that, click the ‘Save Menu’ button to store your settings.
However, keep in mind that this only works if you are using a classic theme.
If you are using a block theme, then head over to the Appearance » Editor page from the WordPress dashboard.
This will open the full site editor, where you’ll need to choose the ‘Navigation’ tab.
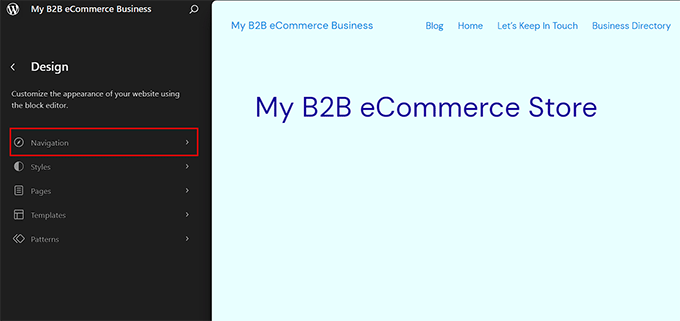
This will open a list of all the navigation menu items in your left-hand menu.
Here, go ahead and click the three-dot icon. This will open a dropdown menu where you can click the ‘Edit’ option.
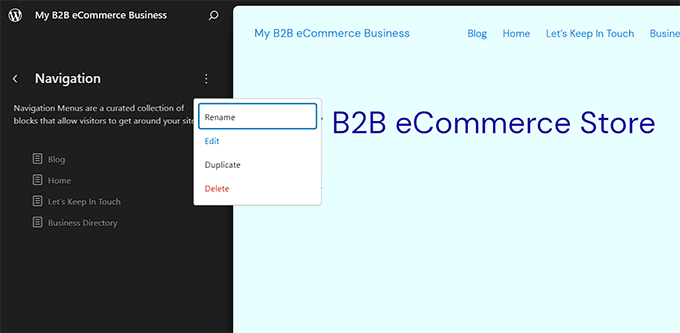
The full site editor will now open with your navigation menu selected. You should see your navigation menu settings opened up in the block panel on the right.
Click the ‘+’ button while the navigation block is selected, and type the page name that you want to add. Once the results appear in the dropdown, simply select the correct page from the list.

Finally, click the ‘Publish’ button at the top to store your settings. For more instructions, see our beginner’s guide on how to create a navigation menu in WordPress.
Expert Tip: If all the steps above seem overwhelming, you can choose WPBeginner’s Website Design Services to build your WordPress B2B store instead.
Our seasoned experts will take care of everything from installing and setting up WordPress to designing custom themes. We can create your core pages, build an attractive home page, add a navigation menu, and even set up your product catalog.
Our services are tailored to your unique needs, and we offer affordable pricing so you won’t exceed your budget.
To start the process, visit the WPBeginner Pro Services page.
Step 6: Set Up Your eCommerce Plugin
To start selling wholesale products on your WordPress site, you will need WooCommerce. This popular eCommerce plugin can easily integrate with Wholesale Suite to create a B2B store.
First, you need to install and activate the free WooCommerce plugin. For details, see our tutorial on how to install a WordPress plugin.
Upon activation, the WooCommerce setup wizard will open on your screen. You can start by typing the name of your store.
Next, you will have to select an industry. For example, if you plan to sell furniture in bulk, then you can simply pick the ‘Home, furniture, and garden’ option from the dropdown menu.
After that, select your store’s location and click the ‘Continue’ button below.

You will then see a list of free plugins that will give your site additional features.
Go ahead and select the options you’d like to add, and click the ‘Continue’ button.
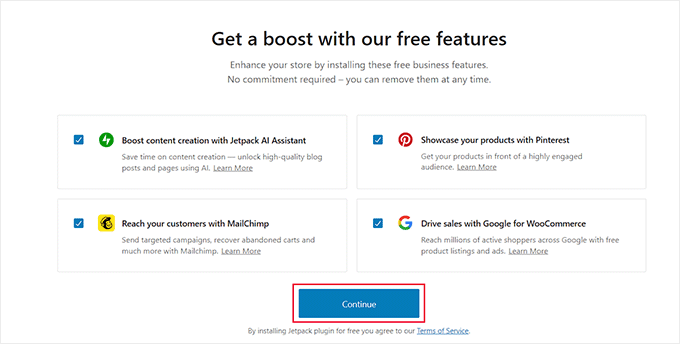
WooCommerce will now set up your store for you. Once that is done, it is time to add a shipping method for your wholesale products.
This is a crucial step for B2B stores because you don’t want to end up getting an order in a region that would be too expensive to ship a bulk number of products to.
To set up your B2B shipping, go to the WooCommerce » Settings page from the WordPress dashboard and switch to the ‘Shipping tab. You will notice that a shipping zone has already been added to the list.
Simply click the ‘Edit’ link under the ‘Zone name’ to start configuring the settings.

This will open a new page where you can change the ‘Zone name’ to anything you like.
You can add as many ‘Zone regions’ as you want from the dropdown menu by choosing areas, cities, or countries where you want to deliver your products.
Next, you can add shipping methods by clicking the ‘Add shipping method’ button.

A prompt will now appear on your screen. From here, you can select flat rate, free shipping, or local pickup as your method. You can also add all of them if you want.
Once you are done, click the ‘Add shipping method’ button.

The plugin will now add your chosen shipping method to the shipping zone.
However, to further configure its settings, you can click the ‘Edit’ link under the method.

This will open another prompt where you must choose the tax status and shipping cost.
Finally, click the ‘Save changes’ button to store your settings. You will now be taken back to the ‘Shipping Zone’ page, where you have to click the ‘Save Changes’ button again.

Next, you have to set up a payment method to accept online payments in your eCommerce store.
First, head over to the WooCommerce » Settings page and switch to the ‘Payments’ tab.
This will open a list of different payment methods and payment gateways that you can use with WooCommerce.
Simply click the ‘Finish set up’ button for the payment method that you want to enable.

Now, simply follow the on-screen instructions to set up the payment method of your choice.
Once you are done, click the ‘Save Changes’ button to store your settings.
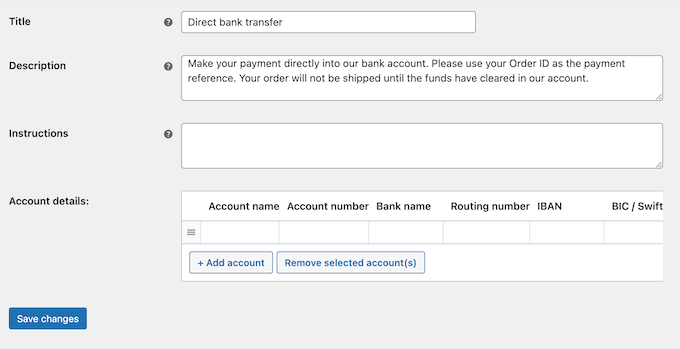
These are just some of the most essential settings for online stores. For more detailed instructions, see our complete WooCommerce guide.
Step 7: Set Up the Wholesale Suite Plugin
Now that you have set up your eCommerce plugin, it is time to convert your website into a B2B business.
We recommend using the Wholesale Suite plugin to do this because it offers everything you need to manage wholesale products and customers. It’s also highly user-friendly.
We’ve tried and tested this tool ourselves and loved it. For more details, check out our full Wholesale Suite review.
First, you need to install and activate the Wholesale Suite plugin. For step by step instructions, see our tutorial on how to install a WordPress plugin.
Note: Wholesale Suite also has a free plan that you can use to set up your store, but you’ll need to upgrade to the premium version of Wholesale Suite if you want the advanced features.
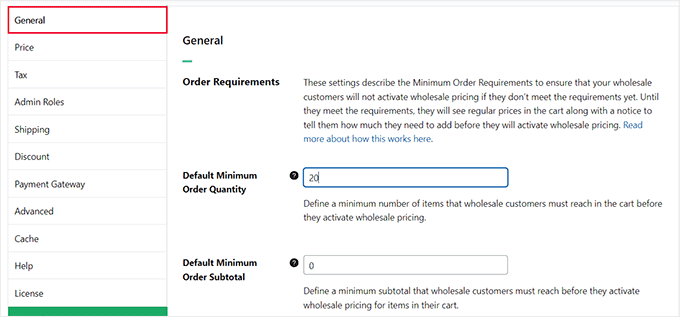
Upon activation, visit the Wholesale » Settings page from the WordPress dashboard menu and switch to the ‘General’ tab.
From here, you can set a default minimum order quantity and order subtotal that users must meet to place an order for wholesale products.
You can also choose to show wholesale products only to wholesale customers, hide quantity discount tables, display coupons, allow backdoors, and more. Once you are done, click the ‘Save Changes’ button.
Next, switch to the ‘Price’ tab. Here, you can check the ‘Hide Retail Price’ option if you only want to cater to wholesale customers.
Then, you can add placement text for cart and price buttons and click ‘Save Changes.’

After that, switch to the ‘Tax’ tab and check the ‘Tax Exemption’ box if you don’t want to apply taxes for wholesale products. Keep in mind that this feature will only be available in the pro plan.
You can also set the pricing display on the front page to show either the default WooCommerce price, include tax in the displayed price, or exclude tax based on your preference.
You can now configure the other settings according to your liking or leave them as they are. Finally, click the ‘Save Changes’ button to store your settings.

Now, head over to the WooCommerce » Add New page from the WordPress dashboard to add your first B2B product. First, you need to add a name, description, and image for your product.
If you only want your wholesale customers to view this item, then you can do that by choosing the ‘Wholesale Customer’ user role from the ‘Restrict To Wholesale Roles’ dropdown menu on the right.

This user role is automatically created by the Wholesale Suite plugin upon activation.
Then, scroll down to the ‘Product Data’ section.
Open the ‘Discount Type’ dropdown in the ‘Wholesale Prices’ section. Here, you can choose to offer wholesale customers a fixed discount or a percentage discount.

Keep in mind that if you choose ‘Percentage,’ then you need to type an amount into the ‘Discount (%)’ field. Wholesale Suite will then work out the price and show the value in US dollars.
Otherwise, if you’ve chosen ‘Fixed,’ then fill in the ‘Wholesale Price ($)’ and ‘Wholesale Sale Price ($)’ fields. If you want to sell the product in retail as well, you can add the ‘Regular Price’ and ‘Sale Price’ at the top.
Then, scroll down to the ‘Wholesale Minimum Order Quantity’ section.

You can now add the minimum number of items a customer must purchase in order to unlock wholesale pricing.
Finally, click the ‘Publish’ button at the top to store your settings. You can now visit your WordPress site to see your first wholesale product in action.

For more instructions, see our tutorial on how to add wholesale pricing in WooCommerce.
Step 8: Add a Wholesale Order Form in WordPress
Once you have added all your wholesale products, it’s a good idea to add a wholesale order form. This will allow users to order multiple products in bulk with a single form.
To do this, you will need to use the Wholesale Order Form plugin, which is a part of the Wholesale Suite.
To get started, head over to the Wholesale » Order Forms page in your WordPress admin dashboard and click the ‘Add Form’ button.

This will take you to the form editor, where you need to add a name for the form.
Then, scroll down to the ‘Order Form Table’ section, where you will see a list of your store’s most popular products and their pricing.
You can also drag and drop modules from the ‘Edit Form’ tab on the right panel to your form’s footer. This includes the search input, category filter, add selected products to cart, cart subtotal, and more.
These elements are useful if you have a long list of products, which can help users find what they’re looking for or see the total cost at the top or bottom of the order form.

After that, you can add table elements like stock amount, SKU, description, and product category to your order form.
These elements can provide extra information to users before they decide to add an item to their online shopping cart.
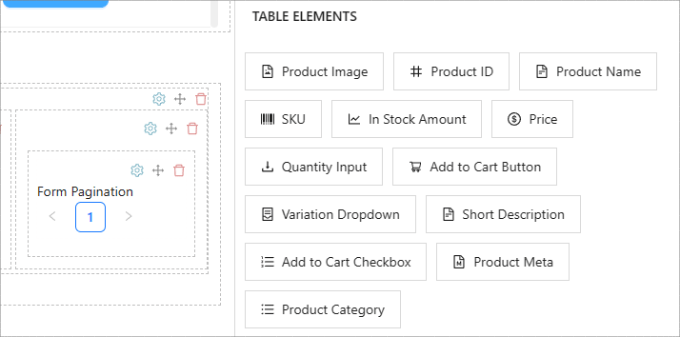
Next, switch to the ‘Settings’ tab in the right column. Here, you can choose to hide the form title, select product sorting order, allow lazy loading for form products, exclude or include specific categories, and so much more.
For more detailed instructions, see our tutorial on how to create a wholesale order form.

When you’re ready, scroll back to the top and click the ‘Publish’ button to store your settings.
Once you do that, a new shortcode field will appear right next to the order form name. Go ahead and copy this shortcode.
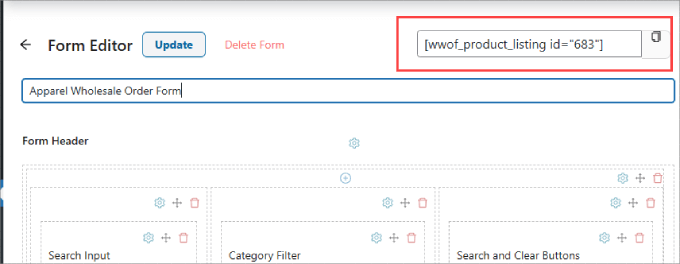
Then, open the page or post where you want to add your wholesale order form and click the ‘+’ button at the top.
Next, find and add the shortcode block to your page and paste the copied shortcode into it.

After that, click the ‘Publish’ or ‘Update’ button to save your changes.
You can now visit your WordPress site to view the wholesale order form in action.

And that’s it! Your WordPress B2B store should now be up and running with all the essential elements.
Bonus Tools to Improve Your B2B WordPress eCommerce Store
Now that your B2B eCommerce store has been set up, here is a list of some amazing plugins that can improve your site’s functionality.
These tools can optimize your site to boost conversions, attract visitors, and make your business more successful.
- MonsterInsights: This analytics solution helps you track visitor behavior, enabling you to optimize your store strategy based on real data.
- WPForms: A user-friendly form builder that allows you to create various forms, such as contact and registration forms, to engage customers effectively.
- Wholesale Payments: A part of the Wholesale Suite, this premium plugin lets you create custom payment plans, automate invoice management, and add secure payment methods.
- RafflePress: An excellent giveaway plugin that lets you host contests, helping you grow your audience and promote your products.
- Duplicator: A reliable plugin for creating complete website backups, ensuring your data is safe and easily recoverable in case of a cyber emergency.
- OptinMonster: A powerful lead generation tool that helps you create popups, sliders, and banners to increase signups and conversions.
- LiveChat: This customer service tool allows you to create chatbots, build a knowledge base, and streamline support processes for better customer engagement.
- AffiliateWP: Perfect for managing an affiliate program, this tool helps you track referrals, manage payouts, and grow your sales through partnerships.
- TrustPulse: This plugin uses social proof to improve conversions by showing real-time notifications of customer actions on your site.
We hope this article helped you learn how to easily set up B2B eCommerce in WordPress. You may also want to see our beginner’s guide on how to add a currency converter in WordPress and our list of some impressive eCommerce statistics that you won’t believe.
If you liked this article, then please subscribe to our YouTube Channel for WordPress video tutorials. You can also find us on Twitter and Facebook.


