Many of our readers ask us about different ways to make money online with WordPress. While starting an online store or doing affiliate marketing are straightforward options, you might also be interested in creating a classified ads website.
A classified ads website is an online marketplace where users can post ads for things they want to sell, buy, or trade. This could be anything from used furniture and clothes to cars, apartments, or even services like lawn mowing or pet sitting.
In this article, we will show you how to easily make a classified ads website in WordPress, step by step.
Why Make a Classified Ads Website?
A classified ads website allows users to post ads for things that they may want to sell. Other people visiting your website can then use the details provided in that ad to contact the vendor and make a purchase.
You can set a specific commission upon purchase or charge users money to post an ad on your website. You can also allow users to add job postings like they’d find on Freelancer or Upwork.
Plus, you will be able to create a platform specifically catering to your local community’s needs for buying, selling, and finding jobs. You can even target a specific niche for classified ads, such as sports equipment or thrift clothing, to attract customers.
This will make it easy for users to buy or sell products right from the comfort of their homes and bring more traffic to your website.
Overall, building an ads website can be an easy way to earn money online.
Having said that, let’s take a look at how to easily create a classified ads website, step by step. Here is a summary of the steps we will cover in this tutorial:
Step 1: Choose a Website Builder
To start a classified ads website, you will first need to choose a website builder.
For this, we recommend WordPress because it is the best website builder on the market, used by over 43% of sites on the internet. It is free, easy to use, and super scalable.
However, you must keep in mind that there are two types of WordPress.
WordPress.com is a blog hosting platform, while WordPress.org is an open-source, self-hosted software. For details, see our comparison between WordPress.com and WordPress.org.
For a classified ads website, you will need WordPress.org, which gives you complete creative freedom and can integrate with any classified ads plugin. To learn more, you can see our complete WordPress review.
Once you have chosen a website builder, it is time for you to purchase a hosting and domain name.
Step 2: Choose a Domain Name and Hosting For Your Website
A domain name is your website’s name on the internet, like LocalListing.com or www.TreasureTrove.com. This is the name that customers must type in their browser to reach your website.
On the other hand, hosting is where your website lives online and stores all its data. You can see our top picks for the best WordPress hosting services if you need help picking a provider.
Now, you will notice that even though WordPress is free, this is where your cost will start adding up. A domain name will cost you about $14.99/year while hosting costs start from $7.99/month.
If you are just starting out, then this can be a bit expensive.
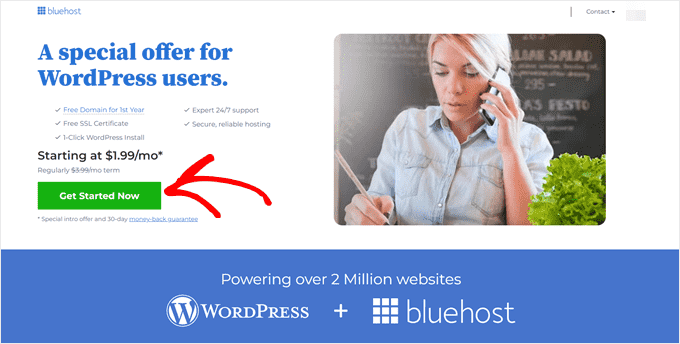
Thankfully, Bluehost is offering a generous discount to WPBeginner readers along with a free domain name and SSL certificate. They are one of the largest companies in the world and an official WordPress-recommended hosting partner.
To get a discount on Bluehost, just click on the following button.
This will take you to the Bluehost website, where you have to click the ‘Get Started’ button.
You will now be taken to the pricing page. Here, you can select a plan according to your website’s requirements.
We recommend the Basic or Choice Plus plans as they are the most popular ones among our readers. Once you make a choice, just click the ‘Select’ button under a plan.

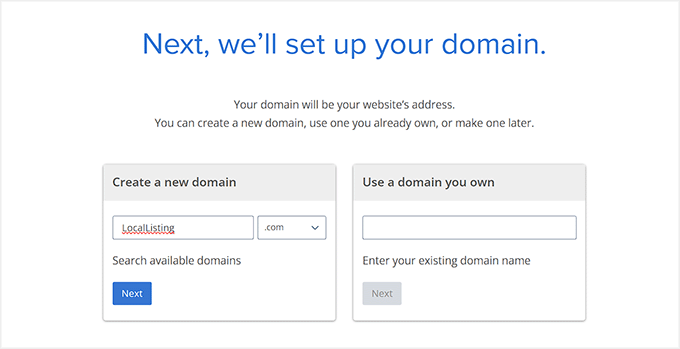
This will take you to another screen, where you can type in the domain name you plan to use for your classified ads website.
Keep in mind to choose a name that is specific to your niche and is easy to spell, pronounce, and remember. For ideas, you can see our beginner’s guide on how to choose the best domain name.
If that doesn’t help, then you can also try WPBeginner’s free Business Name Generator to come with a website title.
Then, go ahead and type the name and click the ‘Next’ button.
After that, you must add your account information, phone number, business email address, name, and country. You will also see a list of extras that you can buy with the hosting.
Then, type in your payment details to make the purchase. On doing that, you will receive a confirmation email with details to log in to your Bluehost dashboard.

This will be your control panel where you can easily manage your classified ads website.
Step 3: Make a New WordPress Website
Upon hosting purchase, it is now time for you to install WordPress. Keep in mind that if you sign up on Bluehost using our link above, then WordPress will be automatically installed for you.
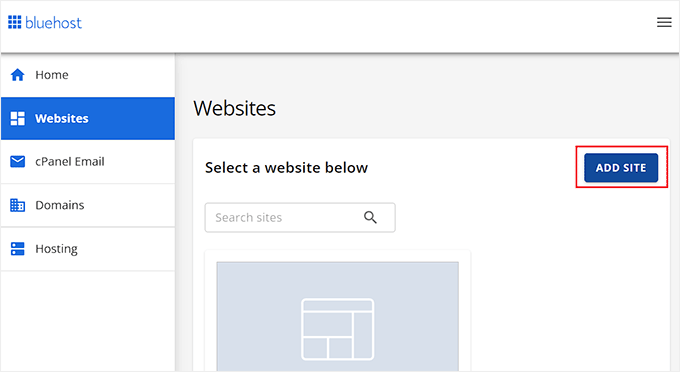
However, if you plan to create a different website for your classified ads, then you can switch to the ‘Websites’ tab in the Bluehost dashboard. Then, click the ‘Add Site’ button.
You will now be taken to another screen to select a site type. As you are creating a completely new WordPress site, you must select the ‘Install WordPress’ option.
If you just want to migrate a WordPress site you have already created to another domain name, then you can choose the ‘Transfer an existing WordPress’ option. Once that is done, click the ‘Continue’ button.

Now, you must add a name for your classified ads website into the ‘Site Title’ field.
After that, click the ‘Continue’ button.

Bluehost will then ask you to connect to a domain name for your ads website.
However, if you haven’t purchased one yet, you can opt for the ‘Use a temporary domain’ option in the meantime. Remember to click the ‘Continue’ button to move forward.

Your WordPress site will now be installed for you and it can take a few minutes.
Once that is done, you will be redirected to the ‘Websites’ tab where you will notice your newly created website.
Go ahead and click the ‘Edit’ button to log in to your WordPress admin area.

If you want, you can also log in to your dashboard by visiting yoursite.com/wp-admin/ in the web browser. Just make sure to replace yoursite.com with your own domain name.
Step 4: Choose a Custom Theme
Once you visit your WordPress website, you will notice that the default theme has been activated on it.
A theme is basically a professionally designed template that controls how your website looks to the visitors.
However, to make a good impression and encourage users to post ads, it is a good idea to replace your default theme with one that matches your niche.
You can use any of the popular WordPress themes and customize them according to your liking.
Additionally, you can see our list of the best WordPress business themes to get more ideas. Once you choose a suitable one, see our tutorial on how to install a WordPress theme.

However, if you don’t like any of the themes, then you can use SeedProd instead. It is the best WordPress theme builder that allows you to create your own custom theme in just a few minutes.
You can easily design your pages using the drag-and-drop builder and premade templates offered by the plugin.
Upon activation, just visit the SeedProd » Theme Builder page from the WordPress dashboard and click on the ‘Theme Template Kits’ button.
This will take you to a new screen where you can browse the templates and select the one you like.

Doing this will launch the visual builder where you can customize the theme using blocks in the left column.
For details, see our tutorial on how to create a custom theme in WordPress.
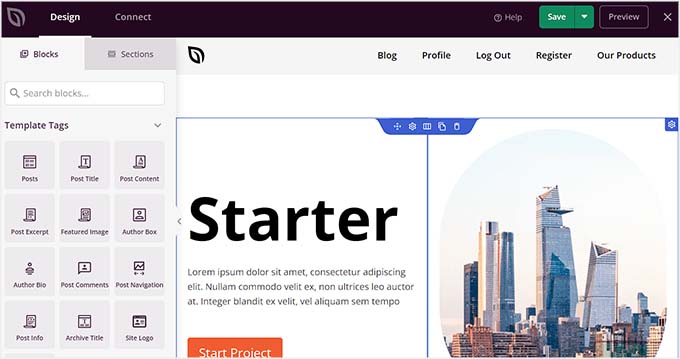
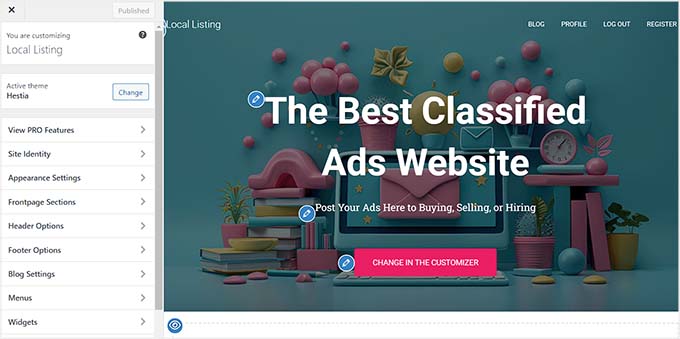
On the other hand, if you have decided to use a conventional WordPress theme, then you must visit the Appearance » Customize page from the WordPress dashboard.
This will open the theme customizer, where you can change background colors, menu locations, site titles, and more.
However, if you are using a block theme, then you will have to visit the Appearance » Editor page to open the full site editor.
Here, you can drag and drop the blocks from the left column to customize your website. Once you are done, don’t forget to click the ‘Save’ button to store your settings.
For more information, see our tutorial on how to use the WordPress full site editor.

Expert Tip: If you feel like customizing your website is too much work, don’t worry—we have you covered! WPBeginner is now offering website design services, where our team of experts can design the perfect custom website for your needs.
For more details, just see our WordPress Website Design Services.
Step 5: Use the Business Directory Plugin to Build a Classified Ads Website
Now that you have customized the theme, it is time to set up your website to accept classified ads.
To do this, you will need the Business Directory Plugin, which is popular for creating a directory, setting up classified ads, organizing listings, and accepting payments.
First, you need to install and activate the Business Directory Plugin. For details, see our tutorial on how to install a WordPress plugin.
Note: Business Directory Plugin has a free plan that you can use. However, to unlock some features like support for Stripe and PayPal, you may need the pro plan.
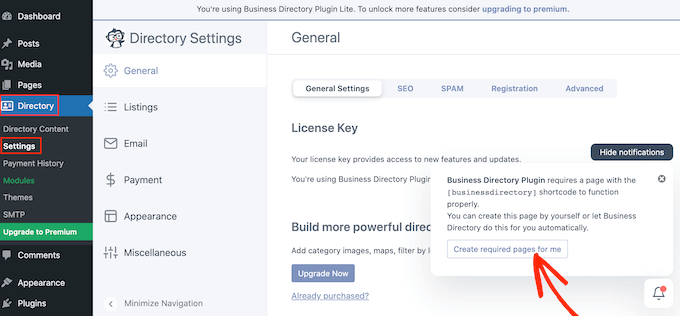
Upon activation, visit the Directory » Settings page from the WordPress dashboard. Here, you will notice a popup asking for permission to create some new pages on your website.
Go ahead and click the ‘Create required pages for me’ button. The plugin will now create a ‘Business Directory’ page where users can view different listings and submit their own.
Once you have done that, switch to the ‘Registration’ tab from the top.
You can now toggle the ‘Require login to post listings’ switch to ‘ON’ if you want users to have to register and log in on your website to submit their classified ad.
Then, you can add the URL for a login and registration page that you have created on your website. If you haven’t done so, then see our tutorial on how to create a custom login page in WordPress.
You can also disable the option if you want to allow anyone to submit listings. Next, click the ‘Save Changes’ button to store your settings.

Now, you can switch to the ‘Listings’ tab from the left column.
Once there, you can configure the number of listings per page, select the default listing status, and more.

You can also take a look at all the other settings offered on this page.
For instance, you can switch to the ‘Searching’ tab and check the box next to the data that you want to make searchable. If you want users to browse ad listings based on a user’s email address, then you can select that field.
Expert Tip: If you are looking to improve search across your entire website, then we recommend using SearchWP. For more details, just see our tutorial on how to improve WordPress search.
After that, click the ‘Save Changes’ button to store your settings.

Then, you have to switch to the ‘Payments’ tab.
Here, you can select a currency and add a payment message that will be displayed to users upon a successful transaction.
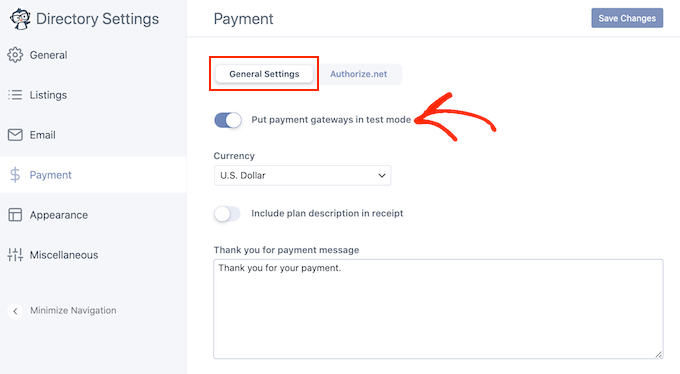
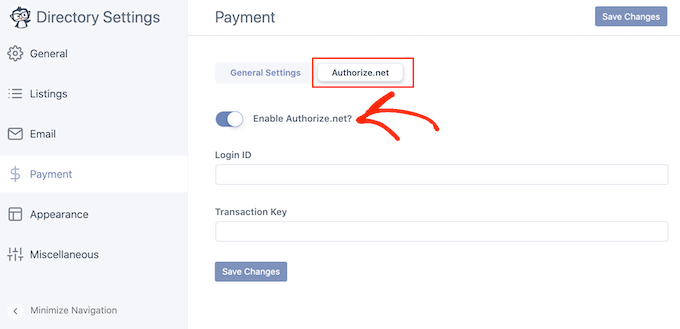
Next, switch to the ‘Authorize.net’ option and toggle the switch. This is the only payment method available in the free plan. If you are using a premium plan, then you will also be able to use PayPal, Stripe, or Payfast.
Now, go ahead and add your login ID and transaction key to connect the payment gateway with the plugin. Once you are done, click the ‘Save Changes’ button.
To start accepting classified ads on your website, you must visit the Directory » Directory Content page and switch to the ‘Form Fields’ tab from the left column.
This screen will now show a list of default fields that are added to the form users will need to submit with their ad details.
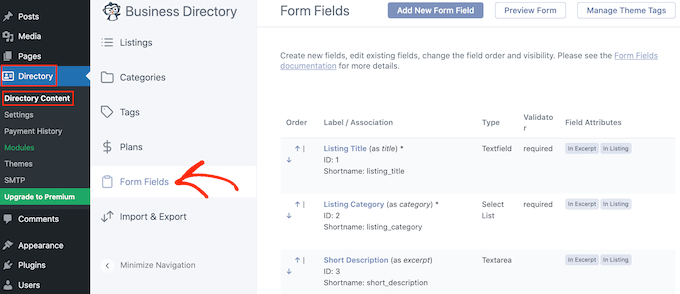
From here, you can rearrange the order of the form fields using the up and down arrow on the left side of each field.
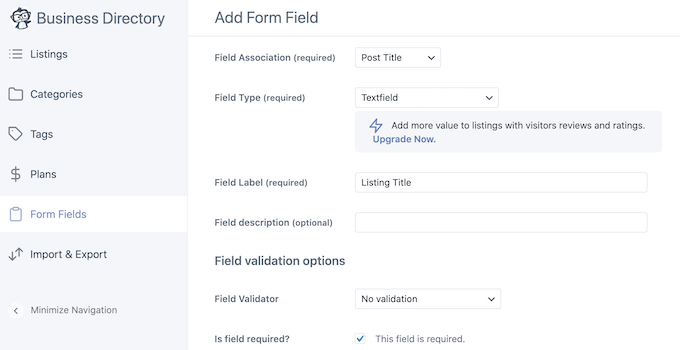
You can also remove a field by clicking on the ‘Delete’ link. However, if you want to edit the field, then you can click the ‘Edit’ link.

This will open a new page where you can change the field label, switch its type, mark the field as mandatory, add an optional description, and more.
Once you are done, just click the ‘Update Field’ button to save your changes.
Then, you need to switch to the ‘Categories’ tab from the left column and click the ‘Add New Category’ button.
We recommend creating at least 4-5 categories for your ads. These will help users browse through your listings and also help you target specific niches.
For example, you can create different categories for sporting equipment, job postings, clothes, and more.

Clicking on the button will open a popup on the screen, where you can add a category name.
Then, click the ‘Add New Category’ button in the prompt to complete the process.

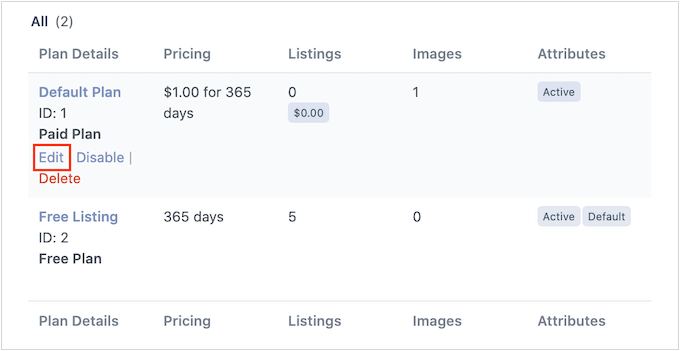
After that, you must switch to the ‘Plans’ tab, where you will notice that a free listing plan has already been added along with a paid plan with $1 for 365 days.
To change these settings, just click the ‘Edit’ link under one of the options.
Note: You can also add a completely new pricing plan by clicking the ‘Add New Plan’ button at the top.
This will take you to a new screen, where you can change the plans’ name, decide how long the listing can run with this plan, the number of images allowed, pricing, and more.
Once you are done, click the ‘Save Changes’ button to store your settings.

Now that everything is set up, just visit the Business Directory page on your website, where you will notice a search form visitors can use to search for classified ads.
Similarly, if someone wants to submit a listing, then they can click the ‘Add Listing’ button.
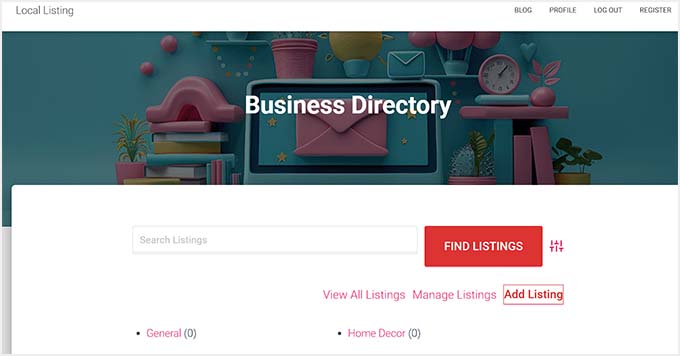
This will direct them to a new screen, where they can add their listing title, description, website URL, email address, phone number, and zip code.
Once done, users can just click the ‘Complete Listing’ button to submit their ad.

Once users start submitting ads on your website, you will be able to view them by visiting the Directory » Directory Content page and switching to the ‘Listings’ tab.
Here, you will notice all the listings are set to ‘Pending Review.’ Now to make any changes, you can click the ‘Edit’ button.
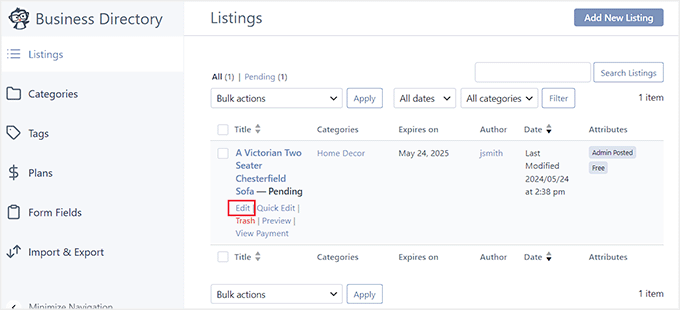
This will open the block editor, where you can check all the listing details and add tags.
Once you are satisfied, just uncheck the ‘Pending Review’ option and click the ‘Publish’ button to make the classified ad live.

If you want, you can also add a classified listing yourself by clicking the ‘Add New Listing’ button on the ‘Listings’ page.
This will again open the block editor, where you can add all the details for the classified ad by yourself.

You have now successfully created a classified ads website.
If you need more information on the Business Directory Plugin features, then see our tutorial on how to make a web directory in WordPress.
Step 6: Create a Home Page and Navigation Menu
The Business Directory Plugin will create a specific page where users will be able to view your ad listings. It will also be named ‘Business Directory’, which can be misleading.
We recommend changing that name to something related to classified ads by visiting the Pages section and selecting the ‘Quick Edit’ option under that page.

After that, you need to add the classified ad listing page to your navigation menu to make it easy for users to browse through your ad listings and submit their own ads.
To do this, you need to visit the Appearance » Menus page and expand the ‘Pages’ tab from the left column. Here, you must check the ‘Classified Ad Listing’ option and click the ‘Add to Menu’ button.
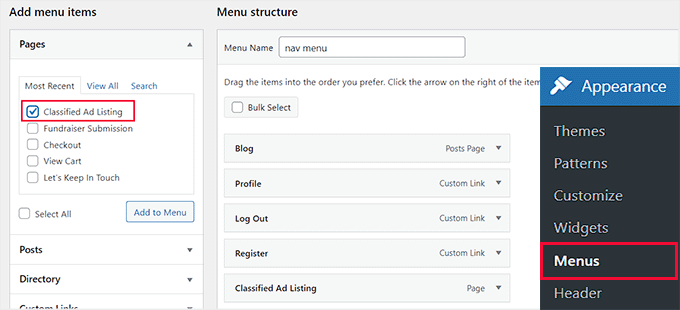
After that, click the ‘Save Menu’ button to store your settings.
However, if you are using a block theme, then this method won’t work for you. To edit the menu in FSE, you must visit the Appearance » Editor page from the WordPress dashboard.
This will open the full site editor, where you must choose the ‘Navigation’ tab.
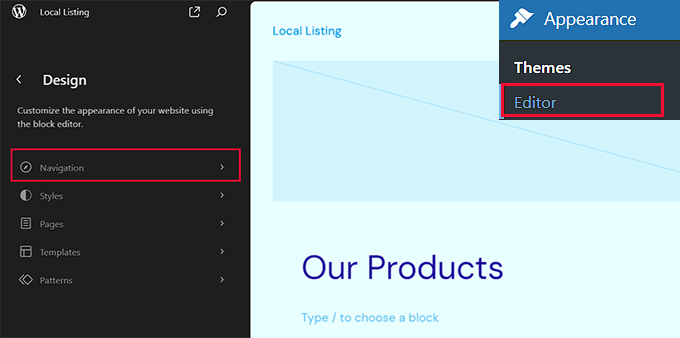
When you do that, a list of items currently present in the navigation menu will be displayed in the left column.
From here, you must click the pencil icon.

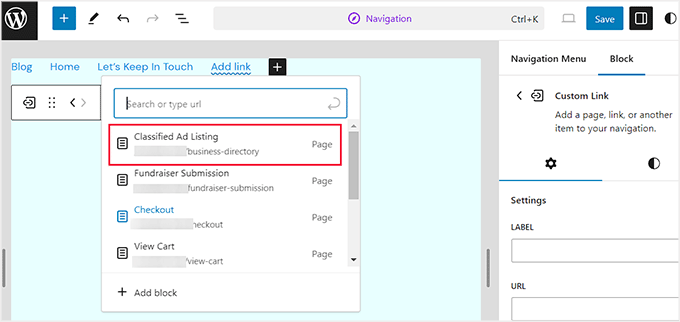
The full site editor will now open the menu section where you have to click the ‘Add Block’ (+) button next to the navigation menu items.
This will open a prompt, where you need to search for the plugin page with the name that you gave it. Once you find it, you can click on it to add it to the menu. Finally, click the ‘Save’ button at the top to store your settings.
For details, see our tutorial on how to add a navigation menu in WordPress.
Next, we recommend adding an attractive home page for your classified ads site. This will be the user’s introduction to your site and may decide whether they want to stay and explore or leave.
To help you with this, you can see our beginner’s guide on how to create a custom homepage in WordPress.

Once you have created an attractive page, you can easily set it as the home page by visiting the Settings » Reading page from the admin sidebar.
Now, select the ‘A static page’ option in the ‘Your homepage displays’ section. Next, open the ‘Homepage’ dropdown and choose the page you want to use.


