If you run an eCommerce site and cater to customers in a certain region, then offering the right payment methods is super important. For online stores in Southeast Asia, accepting GrabPay payments can be a game changer. This digital wallet is growing in popularity in Singapore, Indonesia, Malaysia, and several other countries.
Our partner brands sell WordPress software to customers worldwide, so we have seen firsthand how offering the right payment options can help increase sales. Plus, we have built lots of eCommerce sites with WordPress over the years. So, we know how to optimize the online checkout process to maximize conversions.
In our opinion, you’ll want to make it as convenient as possible for your customers to check out. Offering their preferred digital wallet is a great way to do this.
That’s why we’ve done the research on how to set up GrabPay payments in WordPress. Keep reading to learn 2 easy ways you can do this in your online store.

Why Set Up GrabPay Payments in WordPress?
If you plan to target customers in Southeast Asia, then adding GrabPay payments to your WordPress website can be a great idea. It is a widely trusted digital wallet in this region, with millions of active users relying on it for daily transactions.
When you offer GrabPay as a payment method, you are providing your customers with a convenient, familiar, and secure way to complete their purchases. This can improve customer satisfaction.
Additionally, a GrabPay integration can help your business tap into Grab’s extensive ecosystem. GrabRewards, which is the loyalty program linked to GrabPay, encourages users to shop more, as they earn points for every transaction. This allows you to create a store or site that encourages customers to return and spend more.
Plus, we love how easy GrabPay is to use. Users can top up their wallets using credit cards, bank transfers, or other local payment methods. Once funds are added, payments can be made quickly with just a few taps on their smartphone.
The app also supports QR code scanning, which makes it great for both online and offline transactions.
Having said that, let’s take a look at how to easily set up GrabPay payments in WordPress. In this tutorial, we will be discussing 2 methods. You can use the links below to jump to your preferred approach:
Method 1: Set Up a GrabPay Payment Form in WordPress
This method is for you if you want to set up a GrabPay payment form on your WordPress website without building a full-blown online store.
It’s also perfect if you are not using WooCommerce. For instance, you may want to accept donations, set up recurring membership fees, or charge for your professional services using GrabPay.
The easiest way to add a GrabPay payment form is using WP Simple Pay. During testing, we were really impressed by how beginner-friendly it is. We found that it allows you to add forms with just a few clicks.
In our opinion, it is the best WordPress Stripe plugin, with an intuitive builder, spam protection, and a premade GrabPay payment form template. To learn more about our experience, see our WP Simple Pay review.
To get started, you’ll need to install and activate the WP Simple Pay plugin. For details, see our tutorial on how to install a WordPress plugin.
Note: WP Simple Pay has a free plan. However, you will need the pro version to unlock the GrabPay payment form template.
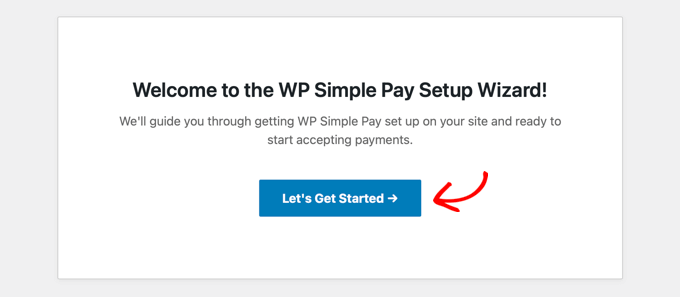
After you activate the plugin, you will see a setup wizard on your screen. Here, just click the ‘Let’s Get Started’ button.
You will now be taken to the next step, where you need to add your plugin’s license key.
You can find this information in your account on the WP Simple Pay website.

Once that is done, you will be asked to connect your plugin with Stripe. This popular payment gateway lets you accept online payments easily.
Keep in mind that since WP Simple Pay is a Stripe plugin, it won’t work on your website until you connect it with a new or existing Stripe account.
To start the process, click the ‘Connect with Stripe’ button.

For more details, see our tutorial on how to accept Stripe payments in WordPress.
Once you have successfully connected Stripe and WP Simple Pay, the setup wizard will ask you to configure your emails.
Here, you can enable options to receive email notifications for payment receipts, upcoming invoices, and payment notifications. You will also need to enter an email address to send them to.
Next, click the ‘Save and Continue’ button.

Then, complete the rest of the setup wizard steps according to your preferences.
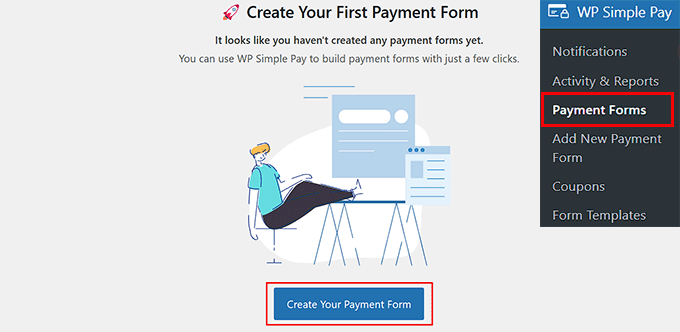
Once you are done, go to the WP Simple Pay » Payment Forms page in the WordPress dashboard.
Here, click the ‘Create Your Payment Form’ button.
You will now be taken to the ‘Select a template’ page, where you will see a list of premade templates offered by WP Simple Pay.
Go ahead and locate the ‘GrabPay Payment Form’ template. Once you find it, click the ‘Use Template’ button under it.

This will take you to the ‘Add New Payment Form’ page. Here, you can change your form’s title and add a description.
Then, choose ‘On-site payment form’ as your form type. You can also check the box under it to turn on spam protection.

After that, switch to the ‘Payment’ tab in the left column. From here, choose your preferred tax collection rates under the ‘Tax Collection’ option.
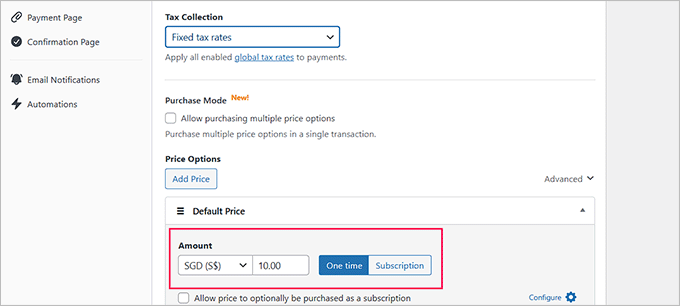
Next, enter the price for the product or service you want to sell through the form. If you’re offering a subscription-based service, choose the ‘Subscription’ option. Then, click the ‘Add Price’ button to include different subscription tiers.
Remember to select a Southeast Asian currency like SGD or RM in this section. If you don’t, then the GrabPay payment option won’t be displayed on your form.
Now, you need to scroll down to the ‘Payment Methods’ section and select the ‘All’ option from the dropdown menu.
You will notice that GrabPay has already been selected from the list. However, you can also add other payment options, such as Klarna, AliPay, or Card, if you like.
Important Note: The GrabPay payment option will only be available if you have chosen a Southeast Asian country like Singapore for your Stripe account.
To change these settings, visit the WP Simple Pay » Settings page and choose a country from the dropdown menu.

After that, switch to the ‘Form Fields’ tab. You can add a form field from the dropdown menu and configure its settings by expanding the tab. Plus, you can rearrange the existing fields by dragging and dropping them.
For example, you can add an address field on your form if you want to sell a physical product or provide in-person services. That way, customers will need to provide their address when they make a purchase or book an appointment.

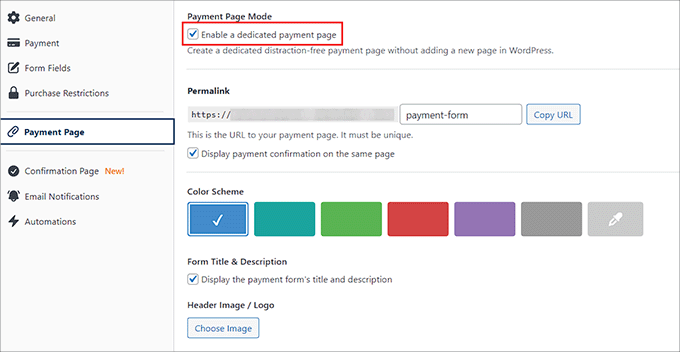
Finally, visit the ‘Payment Page’ tab to check the ‘Enable a dedicated payment page’ box. You can now create a custom payment form page without manually building a new page on your website.
WP Simple Pay lets you customize the form by setting a permalink, color scheme, image, and footer text.
Once you are done, just click the ‘Publish’ button to save your changes.
You can now visit your WordPress site to view the new page with the GrabPay payment form.
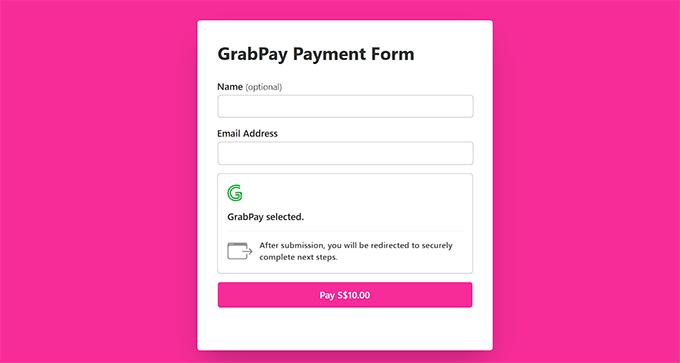
However, if you want to add the form to an existing page on your website, then simply click the ‘Publish’ button after adding form fields.
Next, find the page/post you want to use in the WordPress dashboard. Then, click the ‘Add Block’ (+) button in the top left corner to open the block menu.
From here, find and add the WP Simple Pay block to the page, and select the payment form you created from the dropdown menu within the block.
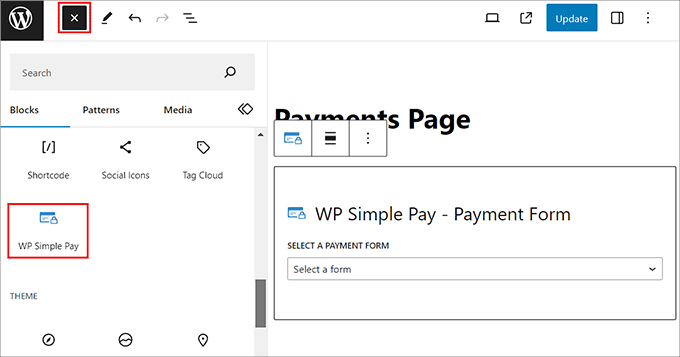
After that, click the ‘Update’ or ‘Publish’ button to store your settings.
Now, visit your website to view the GrabPay payment form.

Method 2: Set Up GrabPay as a Payment Option in WooCommerce
If you want to accept GrabPay payments in your WooCommerce store, then this method is for you.
First, you’ll need to install and activate Stripe Payment Plugin for WooCommerce. For details, see our beginner’s guide on how to install a WordPress plugin.
After you activate the plugin, visit the WebToffee Stripe page in your WordPress dashboard and click the ‘Connect to Stripe’ button.
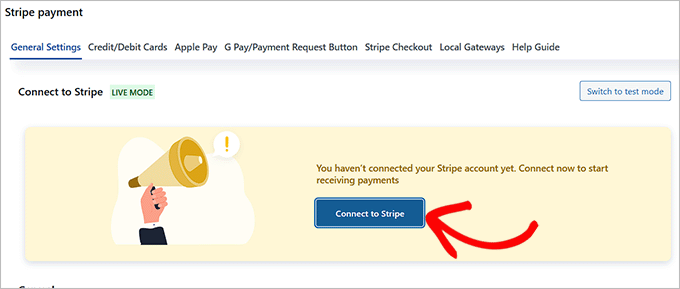
This will take you to a new tab where you will need to follow the on-screen instructions to connect the plugin to your Stripe account.
Once you have done that, just go back to your WordPress dashboard and visit the WebToffee » Local Gateways page. Here, switch to the ‘GrabPay’ tab at the top.
Next, check the ‘Enable’ box to add GrabPay as a payment method in your store.
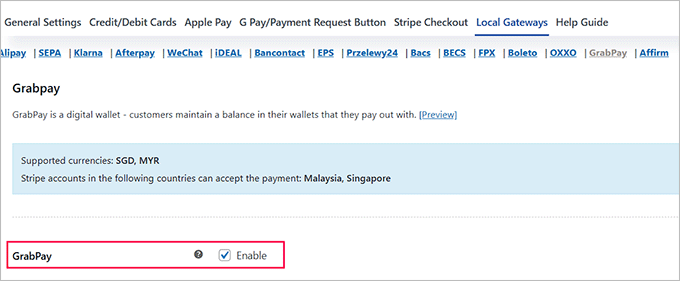
You can also add a title, description, and order button text according to your liking.
For instance, to avoid confusion among global users, you can clarify that GrabPay is currently only available in Southeast Asia. This will prevent users from attempting to use a payment method that isn’t supported in their region.
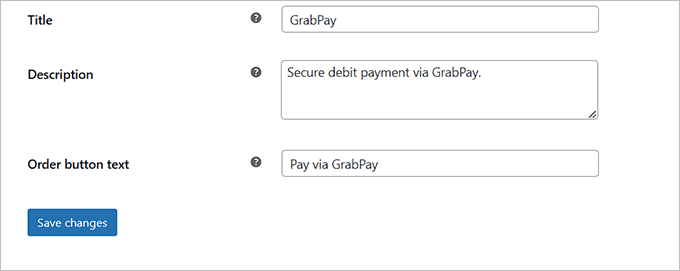
Finally, click the ‘Save Changes’ button to store your settings.
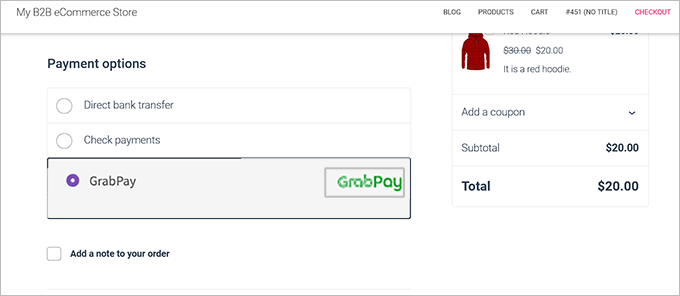
Now, visit the checkout page on your WooCommerce store to see the payment option in action.
👉 Expert Tip: If you run a site with an international audience, then you’ll want to make sure your web pages load quickly worldwide. At WPBeginner, we offer Site Speed Optimization Services to ensure fast website performance no matter where your visitors are.
To get started, you can book an appointment for our WPBeginner Pro Services.
Bonus: How to Accept SEPA Payments in WordPress
Just like GrabPay is a go-to payment option in Southeast Asia, SEPA is a widely used payment system across many parts of Europe.
It’s an initiative by the European Union that simplifies bank transfers in euros. With SEPA, you can make cashless euro payments to anyone in the SEPA area, regardless of their bank or country.
Plus, this transaction process charges lower fees than traditional cross-border payments, making it a great solution.
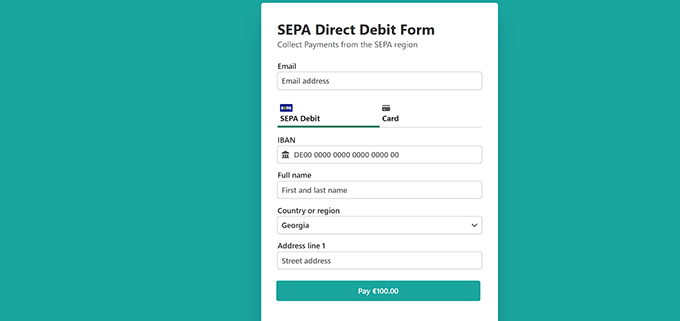
Luckily, it’s easy to accept SEPA payments with the WP Simple Pay plugin.
It even comes with a payment form template specifically for SEPA direct debits.

For more detailed instructions, just see our tutorial on how to accept SEPA payments in WordPress.
We hope this article helped you learn how to set up GrabPay payments in WordPress. You may also like to see our beginner’s guide on how to accept Google Pay in WordPress and our top picks for the best PayPal alternatives for freelancers to collect payments in WordPress.
If you liked this article, then please subscribe to our YouTube Channel for WordPress video tutorials. You can also find us on Twitter and Facebook.


